Monday, January 12, 2009

Project Fridge Top Sliding Tray

before
objective:
we have an extremely small kitchen, thus, every storage space is crucial. but the use of the cupboards above the fridge is often a nuisance to access because of all the clutter on top of the fridge. we'd have to be shift or remove cereal boxes to simply open the cupboard door. of course a sliding door for this cupboard would've been ideal, but apparently the engineer behind this show wasn't the brightest of the bunch (uhh...that was me). so, instead of a sliding door, how about a sliding tray that all the cereal boxes can sit on instead! cereals can slide, doors can swing! it'll be a jazzin' world.

challenges/procedure:
purchase two cabinet sliding rails from homedepot for about $6.50 each. screw them on plywood 'footing', then place another wood plank 'tray' on top, and screw that to the rails. uhh....that's pretty much it.
i didn't want to screw anything down to the fridge...but it didn't take long to come up with the solution of "wedging" this assembly in place, as further described in the next section.
features:
using two wood blocks, i wedged them into place at the back end of the plywood footings against the underside of the cupboard. this definitely gave everything a snug fit, and best of all, this whole assembly is removable in a cinch!
after
conclusion:
all "top fridge" clutter slides out of the range of the swinging cupboard doors. now we can finally easily get to that coffee maker that we never use!
project 'fridge top sliding tray' : PASS!

Monday, July 14, 2008

project oil compartment


objective:
i love my '69 vintage vespa! but it's annoying when you have to measure and mix oil when you feul up. so i decided to premeasure all my oil into small containers. but they sure get tossed around to that far fetched corner of the compartment bin. so, i decided to make an organizer out of the best thing in life....beer.

challenges/procedure:
cut a six pack cardboard bottle package down to size. and...well, that's it.

features:
holds not only oil containers, but also a tire gauge, a multi-tool, and other small gadgets

conclusion:
a six pack to stay in shape!
project oil compartment: pass!

Sunday, July 13, 2008

project espresso pods

the pods
objective:
this one's a request from Jyllian and Isaac for their espresso machine (brand name remains unnamed). she showed me these nice plastic disposable pods that contains the grains. you pop the entire pod into the machine, water goes through it and does the espresso stuff, then the machine tosses the pod in its trash bin. granted it's good espresso, but what a waste for a one-timer! surely this is not the most environmentally friendly thing....so we seek to make it reusable.

snip, grind, and pry
the bottom of one pod can be made to be the lid for the other
challenges/procedure:
there seemed to be two types of pods, one with a filter paper glued to the top (let's call it type 'a'), and the other with a plastic mesh welded to the top of the container (let's call this type 'b'). so for type 'a', simply tear off the filter paper, and make a lid from the bottom of another pod. this will require sabatoging that second pod just for its bottom. type 'b' can be dismantled by snipping and grinding down the weld that holds everything together. you'll be able to pry it apart with a sharp edge.

features:
a reusable pod saves plastic, saves the earth, and ok, you got me, saves money (me cheap!)

conclusion:
keeps me wide awake, wanting to know if it'll work!
project espresso pods: pending!

Friday, June 06, 2008

Project Pro-Filed!!!

objective:
i was recently recognized for my voluntary work with engineers without borders (ewb) - cambodia project on a pbs kid's show, called design squad, which features working engineers giving insight on what they do on a daily basis. matt sisul and i had our 3 minutes to tell them about what we do!

challenges/procedure:
believe it or not, smiling is NOT EASY! but the film crew (jyllian gunther, adam kahan, and isaac miller) was a fun bunch, and we managed to stage through.

film crew and equipment

matt, me, isaac, jyllian, adam
(all photos by mulaohu)
conclusion:
i smiled, and got pro-filed.
project pro-filed: pass!

Saturday, May 17, 2008

project paint roller scraper

objective:
if you ever painted with a roller, you'll know how much of a pain cleaning it can be, especially when it's still soaked with the paint itself. feeling yellow?, no worries, why not try to scrap all that excess paint off with something commonly found while you're painting (or in your home)!
scraping it down
challenges/procedure:
unravel the metal paint bucket handle (or use a metal coat hanger), and bend it to the shape shown. start from the top of the roller, and scrape downwards into the bucket, lightly squeezing your way down. enjoy the bead of paint oooozing out.

features:
small, free, and you can make about 2 of them with one coat hanger!
add it to your painting kit!

conclusion:
wet roller got scraped dry!
project paint roller scraper: pass!


Thursday, May 24, 2007

project corona bottle tiki torch

objective:

so i decided to ornate my backyard with some tiki torches, and these puppies cost a whopping $2.50 each! bloody pricey for a canister of oil held in some bamboo sticks. heck, where i come from, bamboo is plentiful and free. hmm...technically, i'm from jersey, but that's besides the point! i need canisters, and i drink plenty of corona's. why not convert these into tiki torches?


procedure/challenges:

the bottle's cap is pretty thin, and using a phillips screwdriver with one hammer blow will pretty much do a good job piercing right through it. for the wick, i used a 1/4" cotton rope, and thread it through the hole in the cap. fill the bottle up with tiki oil, and you're pretty much set!
features:
to aid in the capillary action, i filled the bottle halfway with sand and glass beads, but river rock pebbles, or anything else, would pretty much work.

conclusion:
ahh...corona! the "light" beer...
project corona bottle tiki torch, passed!


Thursday, April 05, 2007

project kap

objective:
i’ve been wanting to do this for over a year! KAP (kite aerial photography) was first told to me by my geekmate joe davis, who is now exploring the realms of RAP (rocket aerial photography).
the idea isn’t original, and i quickly realized there is a small community of dedicated contributors to the kap technology.
as for the cambodia project, i wanted to capture some images of overall views of the basin, the embankment, and even some images that may tell me something i don’t already know.

challenges/procedures:
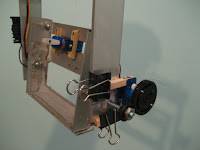
weight is constantly an issue. just think, your camera alone is already heavy, then work backwards from there. i purchased aluminum flat plates from home depot, all the servo equipment from servocity, and a nice kite from coastal kites. as for gears, i tore apart an old unused printer sitting under my workstation for years.
the toughest challenge i found was the rotating bearings at the connections. after scratching my head for days…and days…and days, i came up with a nut/screw system. basically, rather than sticking the screw through a carefully drilled hole which creates high rotational friction, have it thread through its own nut which is then epoxied to the frame. the tolerance is low, and friction is kept at a minimal…and oil regularly. to reinforce all ‘nut’ joints, i used a fiber sheet mixed w/ the clay epoxy for added strength. if it were to break, it’ll break at these nut joints. finally, for “arms and legs” to protect against impact, i threaded bent steel hangers through small holes drilled in the framework.

features:
i originally intended to make a mount to just have the camera shoot straight down, but with a little more added effort, a rotating jig will better serve the unpredictable direction of the winds. this one can rotate 270 degrees, and tilt 180 degrees. the range of the transmitter/receiver is 2000 ft, although my kite’s string is only 1000’.

conclusion:
at times, kap’ing can be frustrating and laborious, especially in low winds, and especially when trying to utilize it for more scientific purposes. but the wow factor in photos and the fun factor in flying a kite both exceed the negative factors exponentially!
project kap: pass!
see the ewb blog!
see a bunch of aerial photos!


references:
-flickr contributors
-http://arch.ced.berkeley.edu/kap/

project peep hole fish-eye lens


objective:
i wanted to take some aerial shots with my kap unit using a fisheye lens, and with the help of other geeks out there, i applied their knowledge. for 8 bucks, you just can’t go wrong!

challenges/procedures:
the only challenge was making an adapter to fit snugly into the lens of my camera (canon elph). measuring the diameter of my camera’s lens, and the diameter of the peep hole viewer, the best adapter i found was this pvc 1” x ¾” reducing coupler i purchased at home depot for $0.39. for a snug fit, i partially lined the inside of the pvc coupler w/ cushioning, the one used to stop windy drafts around leaky windows.


features:

takes nearly a 180 degree shot. check out the 'with' and 'without' shots of my living room.

conclusion:
a great fish eye for a bird’s eye view.
project peep hole fish-eye lens: pass!

project guitar hook

objective:
it was a gift for tubugurl who needed to make some room in her apartment by hanging up her guitars. not until recently, when she purchased a new acoustic guitar, did i get the push to finally complete this simple project.

challenges/procedures:
last summer, while all of us were camping at the delaware water gap, i found this nice big wooden stick useful for stirring up the fire, and later on, a good roof support for my car to carry some extra baggage. the stick was a memento piece sitting pretty in the corner of my hallway since then. until recently, i chopped a piece of it into two halves, and made it into the base for these guitar hooks. using my good saw table, i sliced lengthwise a 4” piece of the wood, then screwed in a garage hook purchased from home depot for about $0.60 each. screws with anchors rated for 200 lbs vertical, and 150 lbs pull out would complete the assembly.

features:
it's a nice au natural look. it's also a nice conversation piece, "that wood came from the campgrounds where wiL made a fool of himself dancing like an Indian"

conclusion:
tubugurl was hooked on the hooks.


project guitar hook: pass!

Wednesday, April 04, 2007

geek spotting: project fish mask


objective:
this is awesome! this person spotted my previous post on the fish mask, and decided to make one for his own halloween costume. that's fantastic!

challenges/procedures:
N/A

features:
N/A

conclusion:
yay, i made a friend!

Sunday, December 24, 2006

project cambodia field tools

objective:
so, we're in cambodia at the water dam site, and we need to collect some technical information. we're talking about soil sampling, soil properties, and surveying.

challenges/procedure:
it's not that we didn't have the equipments, they were just expensive. it's not that they didn't have the equipments, it was just never available for our use. we needed simple soil sieves and we needed simple surveying scope and meter rods. so we made best of what we gathered at the local hardware store.


tripod mounted compass and scope:
taking three sticks and binding one end with a rubberband or tie, i made myself a natural tripod. place a compass on top, or mount my camera's mini-tripod on it, i can have the ability to move and adjust more freely. the compass was used to measuring bearing angles, the scope to eye a straight line down the field and stake out over 450 meters of stakes, and the level (never really helped) was to make sure i was looking reasonably horizontal.


soil sieves:
a #10 sieve is nothing but a screen with 2mm openings. fair enough, buy this big wooden screen used for sieving rice grains from other debris would just do. a #40 sieve is 0.425mm. say roughtly 1/2 a millimeter. manage to find just that with the red sieve, most likely originally intended as a baking measuring utensil. now, a #200 sieve (0.075mm) is a little more tricky to emulate. so tricky, in fact, it was not possible to fabricate accurately at all, so i insisted on buying it. cost a whopping $120, but well worth its use.


soil permeability test:
###

auger extension rod:
###

summary:
knee deep in dirt...and data. gathered so much information, it'll keep us busy for months.
project cambodia field tools: PASS!

Friday, October 06, 2006

project cambodia water dam


objective:
recently, i got involved with a group called engineers without borders, a non-profit organization partnered with developing communities worldwide in improving their quality of life by implementing sustainable engineering projects.
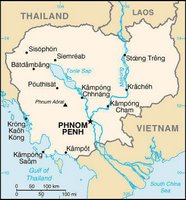
i found myself on the design team of a fast-paced project on reconstructing a water dam in the balang communes near siemreab, cambodia.

challenges/procedure:
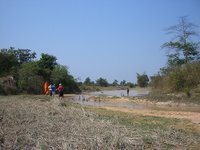
the project is to reconstruct an earthen levee that was destroyed by a flood six years ago, disabling nearby villages of a resevoir that once provided them with water for their rice crops during the dry season.
features:
the reconstructed dam will be a concrete weir (a dam with water gates). the dam will benefit over 18,000 villagers by supplying enough water storage and irrigation for rice crop harvest year round.

fundraising event:
for starters, i'm running a fundraising event!
info as follows:
where: underground
613 2nd ave btw. 33rd+34th st.
new york, ny 10016
when: oct. 12
time: 6pm - midnight
donation: $10 students/$15 others
includes free first drinks
*(all donations are tax deductable and will be matched
by the pb foundation)

summary:
this task is gonna take more than one geek!
project cambodia water dam: pending!

updated summary:
fundraising for the cambodia water dam was a great success! we had over 85 people pack the bar. with their support and a generous match by the pb foundation, we raised over $3000. thank you all for you support!
project cambodia water dam fundraiser: pass!

video by humantranslation
more info on the cambodia water project
more info on engineers without borders nyc chapter
map of the venue underground


photo courtesy of devittj

for more photos

Wednesday, September 27, 2006

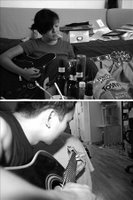
project chopstick capo


objective:
it was jam session with tubugurl, and i didn’t have a capo for my guitar. i had to hit 2 steps up, and as an amateur guitarist, i thought it was brilliant to simply tune every strings 2 steps up. well, guess what? that last "E" string simply snapped! well, luckily we had another set of strings to replace. and this time, i wasn’t about to snap the strings again. so i decided to make a capo!

challenges/procedure:
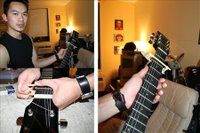
who said take-out food is bad for you? well, it probably is, but the good thing are those disposable chopsticks! combine that up with some rubberbands and you’re good to go! break the chopstick in half, bar them across your fret, and tie them down at their ends with rubberbands! simple is as simple goes. now if only learning the guitar was as simple.

features:
well, it’s disposable. it got us thru jam session that one late night when any guitar stores wouldn’t be open.

summary:
chopstick capo picked the right strings, and they sure weren’t noodles!
project chopstick capo: pass!


photos originally uploaded by tubugurl

Sunday, August 27, 2006

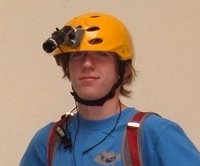
project headcam

objective:
refer to my original headcam posting on may 4, 06!!!
i tell you, there are others out there!
check this guy out!

challenges/procedure: n/a

features: n/a

summary:
using your head wisely. good job!!!

email me @ wolfiebites@yahoo.com