Sunday, May 14, 2006

project fish mask

objective:
my first attempt at costume making for jennie's first directing play w/ the brooklyn playwrights group . there’s a fish theme to the play, and one of the characters serves a conniving and deceiving role. so, i thought, what better fish than the angler fish! a deceiving monstrous fish that lures its prey towards itself with a mesmerizing luminescence attached to the end of its ‘antenna’. the fish is black, you see, thus, disguising itself in the murky waters. and the prey only draws so curious to this dim speckle, until it gets too close and snap, it’s dinner poo poo platter!

challenges/procedure:
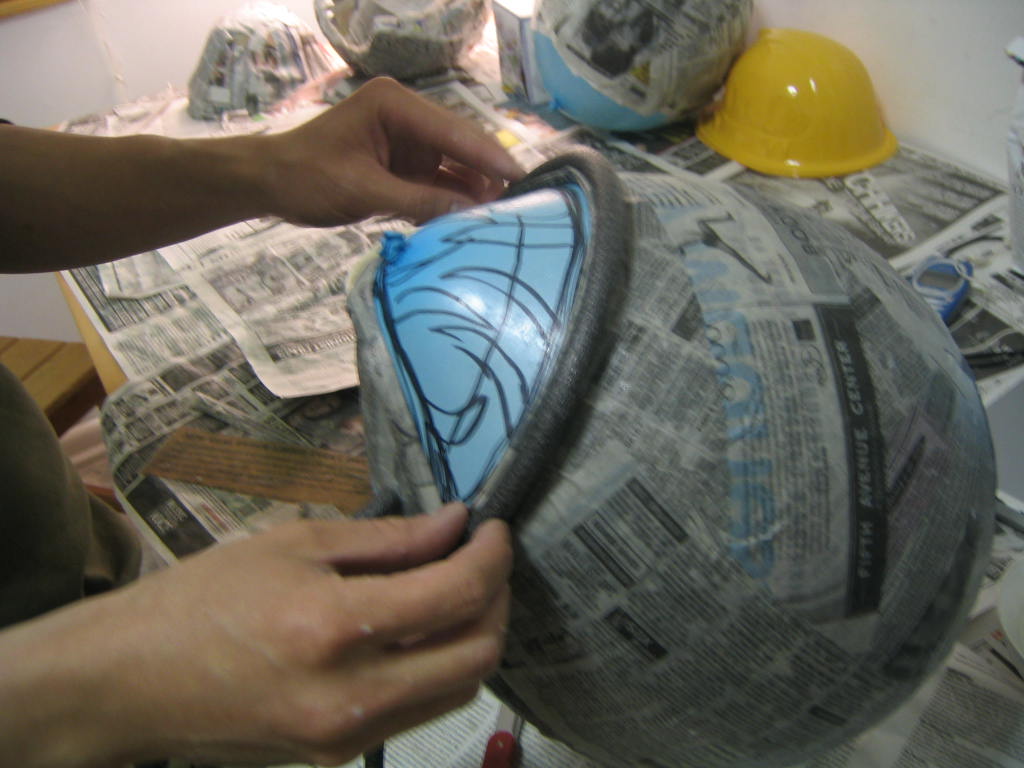
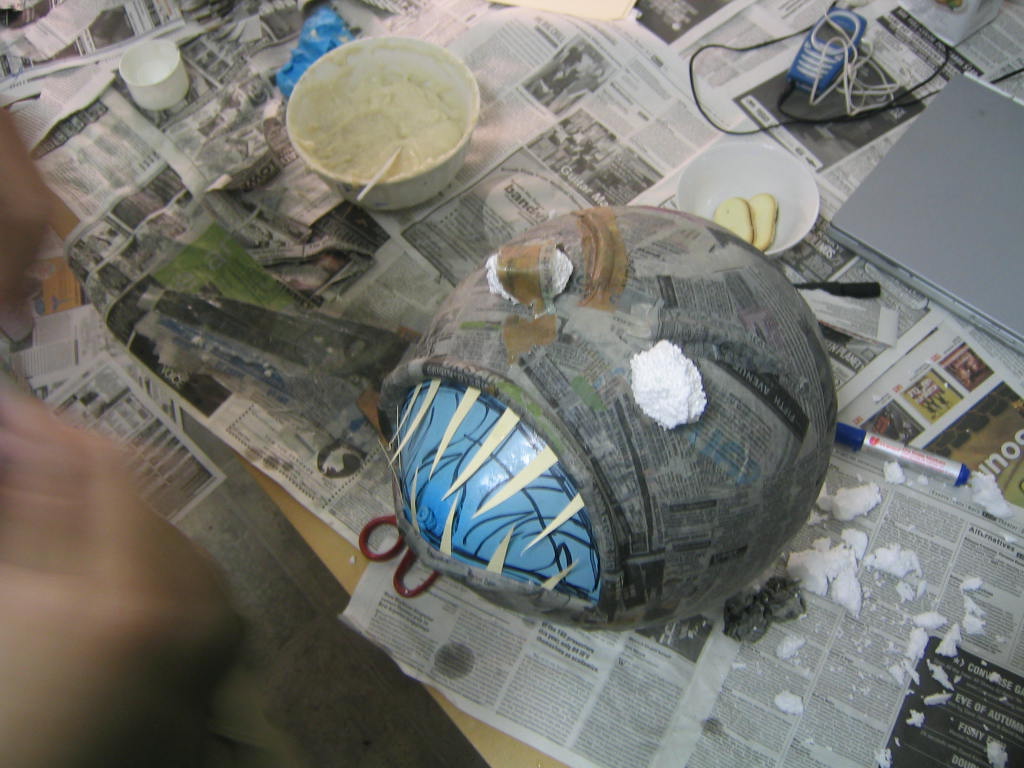
ok, the 4 nights crunch time was definitely a challenge! but, with some instructions on how to make a paper mache mask, we pulled through. using a balloon as a template and sketching board, layout a thin layer of newspaper strips dipped in a water/flour mix. several layers later, voila! after drying, whip out several spray cans and let your imagination run wild like picasso! top off with a blob of styrofoam to make the eyes and you’ve given some definition and character to your fish. jennie made two masks, whereas i focused on my baby, the angler fish mask.

features:
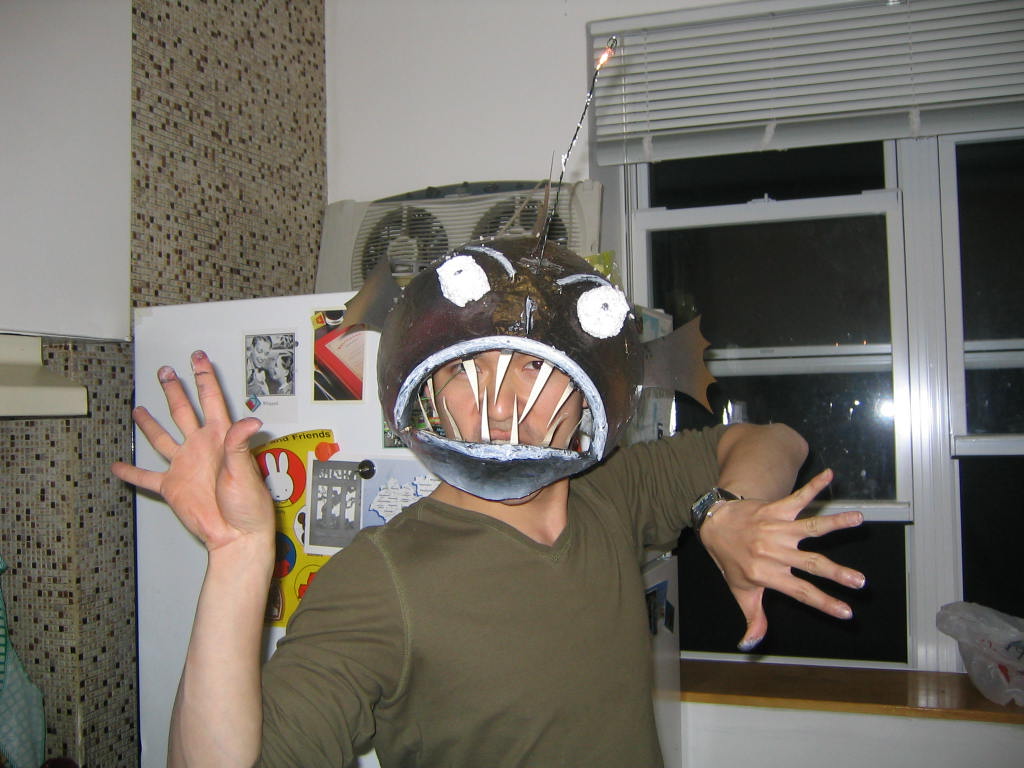
ok, so i went beyond picasso, and geek einstein kicked in. i thought i wired the mask up with some lights! after all, it is the signature ingredient to this monstrous beast! and heck, if i’m gonna give him a lit angler, why not light up his eyes as well!
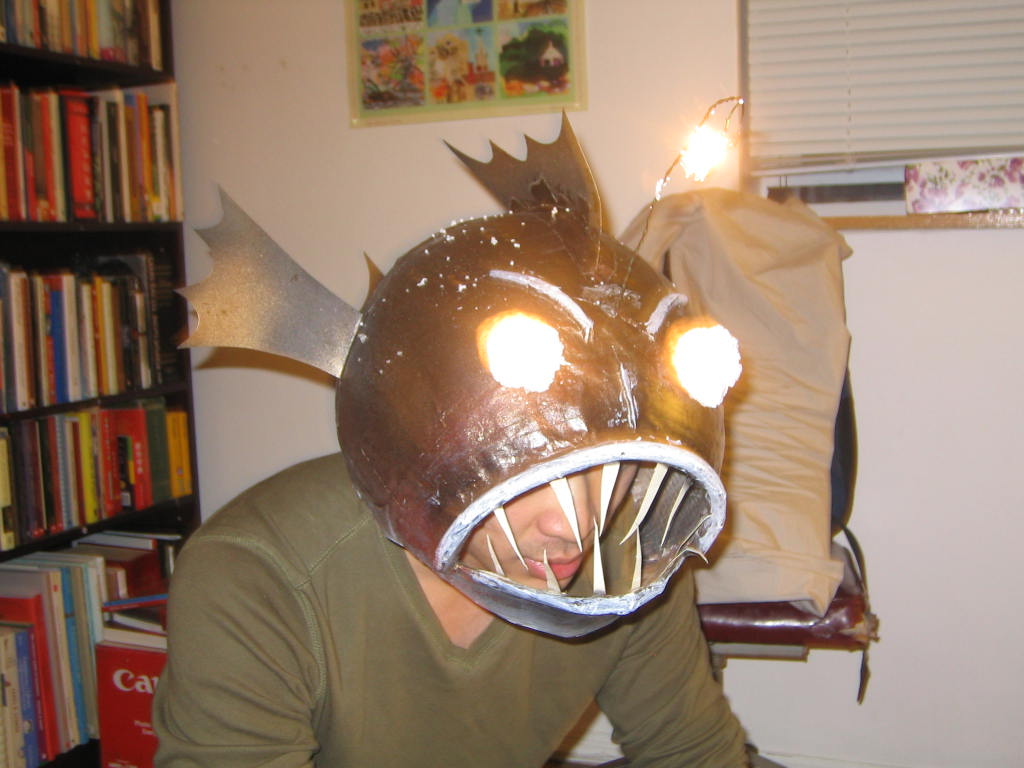
i took 3 x-mas light bulbs from jennie’s x-mas decoration kit, hooked it up to two aa battery pack, and ran wires up and down, through the nose, through the eyes, and all around the internals to get this thing lit. look at this thing, isn’t it just one ugly motherf#$@#. oh, and you’ll like this. the “on-off” switch was merely two small binder clips. you clip one over the other, thus closing the circuit, and you got yourself light! edison should’ve been there to see it.

summary:
no encore per say, but it sure was an audience pleaser, a director pleaser, a cast member pleaser….and heck, i’m pleased.
project fish mask: pass!

project futon roof rack

objective:
ever thought about throwing a bed rack on top of your car? boy, i’ve always dreamed of doing so! no, i kid you. but i did desperately needed a roof rack for my car, as my car isn’t exactly mansion size per say. it’s a suzuki sidekick and i love this puppy. i’ve deemed it the “blackmobile”. but it doesn’t have much of a trunk, nor cargo space. and every time i do road trips with my friends, we are jammed in there with luggages, backpacks, purses, and manbags on our laps! additionally, when ski season comes around, forget about it. the inefficient diagnol placement of the snowboards take up the entire back seat!

challenges/procedure:
think about it for a minute, it’s a soft top. that took me awhile to think about how to go about placing anything on the roof at all! i’ve done several searches, and calmini has one that permantly attaches with brackets screwed into the car, spanning from the main roll bar, hovering over the top, then down and screwed into the rear chasis. it never touches the canvas at all. the bad thing is, though, it costs over $350. forget that.
after thinking about it for awhile, it became rather simple. instead of having the main bars span transversely (from door to door) like most cars’ roof rack do, i’ll have it span longitudinally. i thought of having it rest on the windshield’s roll bar and the main middle roll bar. the rear roll bar is hardly a support at all, but it can take some load. it’ll mainly be held back by the tensile stretch of the canvas itself. it’s main function is to just hold up and shape the canvas at the rear. so i must be conscious to place all of the load towards the front of the car, rather than the back.
a few years ago, while walking pass a pile of trash, there beholds a futon rack. perfect for what i needed, having two main bars going longitudinally. as for tying it down, i’ll run two straps of nylon straps on a ratchet set placed near the front and middle support. that thing shouldn’t go anywhere.

features:
for the bearing pad, i cut up some styrofoam pipe insulators and wrapped it around the rack where it’ll make contact to the car. i purchased a bunch of bungee cords of various colors and sizes. i also purchased a cargo roof canvas bag from target for about $30. and i just had to order from coleman a ski rack clamp, which i installed near the rear of the rack. this was about $60 or so. so i pretty much supped this thing up.

summary:
i get nervous with the added roof weight, and drive much more cautiously around curves, as this car is very susceptible to roll-overs. but despite that, i can have good long road trips with a car fully loaded with friends rather than cargo. and for ski trips, it’s fully loaded inside and out. all the backpacks and ski gear stays on top, and all the silly chit chat gossips and mock ups stay inside. i enjoy it!
project futon roof rack: pass!

project bike bbq

Wiener-Mobile
Wiener-Mobile,
originally uploaded by
tam!
objective:
this was the summer when mark and i decided to build a smoker. we got as far as making up several sketches, but never building one due to limited tools. and yea, we just got lazy. but, as i was doing some research on smokers, i crossed many different and interesting designs by stores and enthusiasts everywhere. inspired by one of those smoker set on those vintage carriages, i decided to slap a bbq grill on a bike instead.

challenges/procedure:
i already had the bike. it was sitting in my basement for years. and no, it wasn’t mine. i swear!
the bbq grill i found chucked away by my neighbor. i decided to give it a new home. it was pretty banged up and rusted, so i gave it an unbanging job by hammering out all the dents. hosed the sucker down to blast away all the cob webs and loose rust. then sprayed on a new coat of black heat resistant paint.
my main worry was making the grill stable enough to hold mega pounds of precious manly beef and hot hot hot charcoal without spilling over. i removed the seat, but kept the pole that was attached to the seat. the grill would sit on this pole and the bike’s original rear rack. it was very unstable, especially when the lid was open, shifting weight more towards the back. several hose clamps cinched it down to the bike’s rack, but the bike itself was rather unstable as it only stood upright with the rear wheel center stand. so i attached a longer rod that’ll widen the center stand and allow the bike itself to be more stable.

features:
the brakes actually keep the bike from moving. i clamped down the front wheel brakes with a zip tie or the like. the bell still works, and it’ll be rung when the food’s done. and the front basket holds all the grilling tools.

summary:
the reveal was on my first bbq at my place. over 50 people showed up, and all expressed quite delight to not only the food (thank you jennie) but to also where the food grilled off from! a crowd pleaser indeed!
project bike bbq: pass!

project headset winder

objective:
ever get your handsfree cell phone headset all tangled up in your bag or your pocket or your glove compartment? i do. and i can’t make meets end between the ear piece, or the plug in piece, and when i finally figure it out, i’ve gotten a cord that’s full of knots and only half the length it should be! if only i can wind this cord into a small compartment to store neatly away. eureka!

challenges/procedure:
make a winder out of a 35mm film container and a bic pen. the black soft container is easy to work with. drill a hole at the top, and two on the sides, then, with a regular scissor, cut down from the top to the holes on the side. this is where the wire will thread through. screw in a screw (about ¾” long) through the base to act as a pivot. cut to length the end of your bic pen and drill a hole through the middle. again, cut lengthwise down to the hole to allow the wire to feed through (this part may be difficult, i used a little dremel). once all done, feed the wire through the pen, then the container, then insert the pen into the pivot and close the cap. wind like you’ve never wound before!

features:
small, lightweight, and, uh…, free? to unwind, simply hold at both ends and pull. i wish i can come up with some spring loaded pivot to automatically reel it back in, but for now, i’m content to just wind it back myself.

summary:
i always know where it is, and where it is is always tangled free! i give it 4 bars on full reception and battery!
project headset winder: pass!

project satelite dish bird bath

objective:
i wasn’t too fond to begin with when my neighbor decided to put up a satellite dish in my backyard’s “air-right-of-way” several years ago. even though it’s installed “onto” his building, it’s still rather encroaching and i’m sure there’s a city code about it. in any case, not until recently, i noticed that the apartment which the cable fed into was vacant. so i helped myself to my heart’s desire and remove this eye sore. as i took it down, i thought it’d be a shame to just discard it, as i felt that this was a good steel structure. well, the pack-rat in me couldn’t see it go, so i bent it back and forth, and all of a sudden it hit me, i could make a bird bath out of it!

challenges/procedure:
i removed most of the miscellaneous doohickey that i didn’t think i needed, i.e. the cable wires and all that signal retrievers. since i had a 1” copper tube laying around (also from a recent ‘pack-rat’ incidence several weeks earlier), i decided to put it to good use and cut about 3’ of it. i started hammering the poor thing like a madman into the ground with my buddy sledgehammer, which i’ve nicknamed “ong khai” after my dad. he always comes in handy! slide the satellite post over it, adjust the angle for optimal water holding capability (uh…that would be…flat!), fill it up with water and you got yourself a bath! so now, i’ve built Rome. i can only hope the “people” will come!

features:
well, it holds water. and as an extra touch, i did purchase a little bird feeder which i’ve attached to it.

summary:
it did take a few days, actually, a week, as i neared a feeling of disappointment when, to my joyful delight, i noticed for the first time a pair of birdies swooping down to this new playground of theirs. they pecked innocently at the water, glanced back and forth in that rigidly quick “high on caffeine” movement, then just flew away. that just made my day.
project satellite dish bird bath: pass!

project coffee table

objective:
so it was christmas '05! and along with that comes the stress of what to get for jennie. usually, when it comes to gifts, i’m financially bound, but creatively, i’m free to explore. and by financially bound, i just really mean i’m cheap. and since jennie always needed a coffee table for her living room, and since a decent coffee table runs around $75 or up, and since i’m cheap, i’m gonna make one! i mean, how hard can it be to slap a few slabs of wood and post together! duct tape holds everything!

challenges/procedure:
after sitting in jennie’s living room long enough to ‘feel’ out a decent size, i sketched up a rough design on cadd. i’m sure jennie has wondered every now and then why i sit in her living room alone, mumbling dimensions to myself, and putting my hand out in the air to weigh out an imaginary height for the table. she didn’t really have much of a clue that i was building this anytime soon, and definitely not for xmas. so it’s all a surprise you see, along with me jumping out of that cake in a bunny suit. hmm, i should’ve stopped at hello.
moving along…..two 2’x4’x3/4” ply taken right of the shelf of home depot. four mail box posts (4”x4”) cut at 15” height, and don’t rely on that home depot guy to do it exact. at least that one dude in jersey city was either high or buzzed…or just dumb. you can’t really tell what it really is here. and iterating several times to him that “it’s a coffee table that you’re making, and that you would prefer it not to wobble” didn’t seem to help much. i tell you, it must be in our water?!
Again, moving along…after screwing everything together and giving it a good sanding, I continued on with 2 layers of stain, and finished off with 2-3 layers of polyurethane.

features:
i tell you, wright was talking to me. no i’m not schizophrenic, but i did hear voices. with the help of my friend, mr. saw table, i was able to make some linear groove details on the table surface. the idea was sketched out since cadd, but to see it come together helped me create it more progressively. it’s symbolic of a “ribbon” wrapped around a gift, get it? and at that very corner was where i actually did place a big red bow tie.
in addition, the “double deck” table allows for storage of magazines and other stuff you usually want to take off the surface, say a remote control, etc.

summary:
the reveal had jennie by surprise. i unveiled it in front of her house, topped with a big red bow tie, and a dozen of roses in hand. Forget the Lexus, this was a December to remember!
project coffee table: pass!

Thursday, May 04, 2006

project light sculpture

objective:
i wanted a modern looking design for a light sculpture by my bedside. i just sketched something up on cadd and ended up with something like this.
the intent was to simply make it out of regular "off the shelf" timber from Home Depot or the like. The main post is a regular "mail box" 4"x4" post, whereas the bays would just be 3/4" ply.

It's a little Frank Lloyd Wright, and a little Calatrava I suppose, not that I'm claiming I intended on doing anything like it. On each board, i wanted something linear engraved on them, perhaps like a groove linear design or something. Wright would totally do something like that! And Calatrava would just kick this whole thing over and tilt it 45 degrees, precariously holding it back with nearly invisible thin wires.


features:
the idea was to somehow run the electrical wire up in the main post, and feeding them out to each bay. how i was to drill a long tunneled hole up the entire length of the post was a challenge. i definitely didn't want to section up the post at all, that would just not look nice to me, unless i spent alot of time and effort to putty each joint to making it look seamless! on the underside of each bay is where the light will be installed. the thinner the light, the better! it'll cast a soft and subtle light to the bay below it, which may shelve photo frames, or other things worth displaying....maybe even an alarm clock for all that matters. then, i wanted something like a step switch, where you just step with your feet to turn it on/off.


summary:
project light sculpture: pending!

project headcam


objective:

how about slapping your camcorder to your head?
the idea came to me when i wanted to make videos of me and my friends riding down the slopes on our snowboards.

challenges/procedure:
on my regular bike/rollerblade helmet, i looped a nylon strap through the holes and around the camera and cinched it in place.
the problem was, it was a bit "top heavy", and after wearing it for a few minutes during a testing phase within the comfort of my home, i felt a little bit dizzy from all the head weight. And that's just from walking around in my house, nevermind being on the slopes with this thing.

features:
i had wanted to put some cushioning around it, plus, somehow make it waterproof. but after a brief trial period at home, i just scraped the whole idea altogether.

summary:
Project headcam, failed!

Tuesday, May 02, 2006

where it all begins


wow, this is the begginning of it all! after much encouragments from my friends, i'll start a collection of photos of all the itty bitty knick knacks that i spend so much of my time doing.

some ideas were just big flops, and some were a great crowd pleaser. Make a comment and vote on it; "yay" or "nay" ?

so here it goes fellas, let's see where this will take us... i'm so excited!

email me @ wolfiebites@yahoo.com